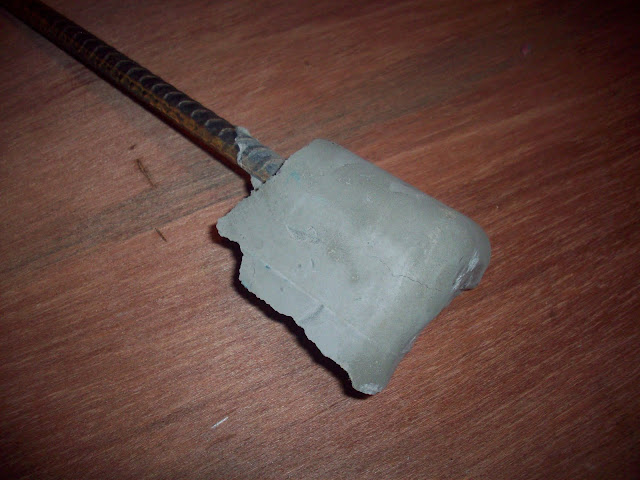
The idea of using polymer concrete is not new. There are multiple papers about the benefits of using polymer concrete in a machine frame due to its excellent vibration absorption. There was one report that boasted a three to one improvement over cast iron. There are many topics of the CNC forums that discuss the use of polymer concrete as well. We believe there has not yet been a practical small machine application for the use of polymer concrete but we will be showing our attempts and building a small machine that utilizes polymer concrete as its main frame and XY table. Here is a history of our R & D.
Materials:
• Quickrete, polymer patching mix
• ½” diameter rebar
• HDPE forms
• Plastics container for mixing
Test #1
Test #1 was a test to see how thick and large of a piece of polymer concrete could be created with the Quickrete polymer patching mix. The polymer mix was very easy to work with. It consists of a fine powder with no heavy aggregate and mixed very easily with water. We poured the mix into a small plastic container, placed a piece of 12” rebar in it and let it dry. The next day we popped it out of its mold and we had a concrete lollipop. We let it set for a few more days and then we started dropping it and hitting it with hammers to test how tough it was. The thin parts near the edge broke but the main body of concrete was strong. It was time for test #2.
Test #2
Test #2 was our first attempt at building a mold of an actual machine part. We decided to create an “L” shape milling machine frame, 18” x 15” x 2.5” wide and thick. First up was building a strong and sturdy mold. We had extra ½” thick HDPE so that is what the mold was made of. The mold pieces were cut to length and bolted together. We left the mold open so that we could cast a right and left hand mold. We clamped the mold down to a thin piece of smooth plywood. We mixed our first large batch of the polymer mix and poured it into the mold. About halfway through the pour we placed the bent piece of ½” diameter rebar in the mix and continued pouring. We used a scrap piece of HDPE to trowel and try and smooth out the mix. I ended up trying to smooth the open part of the mold with my fingers but that left an ugly finish. Our first “L” shaped machine frame was left to set up for 24 hours. We then removed it from the mold. Luckily our mold was bolted together and we were able to remove the part without hammering it out. We let it cure a few more days before we started to handle it roughly. Our machine part was strong and sturdy. We performed a bench strength test which consisted of a large man trying to force the “L” shape apart by placing the corner of the “L” on the bench and leaning on top of the two legs trying to cause a break or fracture. This is not very scientific but we guesstimate that the force applied was 100 – 150 pounds. The “L” didn’t even budge which was consistent with the FEA study. The FEA showed that the “L” would deform .0006” when 100lbs of force was applied to try and open the “L” shape. The FEA was performed with concrete only and no rebar so we can anticipate excellent strength characteristics for this machine frame piece. Our initial machine design will also utilize two of the “L” shape frames so our strength estimates can be doubled (minus some a factor of safety).
Test #3
For test #2 we cast a right hand “L” shape and for test #3 we cast a left hand “L” shape. The only difference being the sides with the rough areas will be assembled towards the inside of the machine. For test #3 we also used large pieces of HDPE to press and finish the exposed part of the mold which resulted in a much better finish.
Test #4 - Our first failure!
Test #4 consisted of the addition of charcoal concrete coloring liquid. This was an absolute failure. I must ahve missed the fine print that said not to mix color in with polymer concrete. It is better to learn these things before moving any further. It looks like any future machine bases will now be gray in color. As you can see from the photos the color didn't mix very well and the dark edges just crumble away after 18 hours of curing. The other casting were able to be hammer struck after 12 hours. I also tested the threaded inserts and they didn't even hold up at all either. Test #5 will retry the threaded inserts without coloring.


